

March 9, 2019
Hijack GTM’s Native Events to Auto-populate Contextual Data Markup
Get the ultimate hack to leverage HTML5 data- attributes for your tracking setup. Clean markup. Less CSS selectors.
Recently I read a brilliant article by long-time contributor Yehoshua Coren. While in the beginning of the article he was just entertaining in reminiscing about the early beginnings of his journey, he totally caught me as soon as the chapter Contextual Data Markup started.
But why? Taking a lot of examples from the practitioner’s daily life, he carefully explains how it makes sense to use data- HTML attributes to store tracking-relevant information.
I will not rephrase all the examples here, you should definitely head over to his article and check them out by yourself.
Doesn’t sound too exciting? Yet it is. True, using data- attributes by itself is not new. I also work with data- attributes frequently.
Yehoshua, however, advocates taking data- attributes to the next level by extending GTM’s native events (think Click Trigger, Visibility Trigger) to collect all data attributes from the semantic context of the event’s gtm.element the moment the event is pushed to the dataLayer.
That is, all the data- attributes that can be found attached to the gtm.element OR attached to one of gtm.element’s parents (We call it traversing the DOM upwards) will be nicely available next to GTM’s built-in variables such as elementId.
Wait a moment, traversing the DOM? Yes, if this does ring a bell, the method outlined here might even help you to streamline Simo Ahava’s “Capturing the correct element” method. If you want to collect more attribute types than just the data- ones you can pick up the code from this article and extend it according to your needs.
That way, you can build a robust tracking foundation which relies more on implemented data- attributes than fragile css selectors.
The tiny problem with Yehoshua’s article is that he elaborates on how we built a great solution, yet he refuses to make it open-source but recommends you buy a license from him. Which is totally fair, though. There’s a lot of knowledge sharing in this industry but not everything can be a free lunch.
In this very case, however, I wanted to have a similar functionality for myself..but also built by myself. That’s why this article is a follow-up article to Yehoshua’s, including the code. Nevertheless, the so called Heisenberg Plugin that he advertises is certainly a very fine piece of code, so I urge you to find out about his licensing terms even if you start with the code from this article.
For the moment, enough theory. You will now get a short table of contents for the remainder of this article before we jump into hands-on material so that you can really understand what’s going on.
One e-commerce example incl. all screenshots to understand the benefit
The implementation code for you to copy and paste
Detailed and technical explanation of how the code was derived
Here we go.
One e-commerce example incl. all screenshots to understand the benefit
To make a brief example, let’s have a look at the demo of the e-commerce software Shopware which is one of the leading systems for the German market. You can easily find the demo doing a Google search.
This is how a category page /beach-relax/accessoires/ currently looks in this demo. You can see the typical product grid, here two items per row.

Now let’s check the (shortened) HTML markup for the product grid. All you have to note here is that Shopware already populates data- attributes at various levels of the DOM by default. So there’s potentially a lot to track even before adding custom data- attributes.
    *<!-- First the product grid's container -->*

    <div class=”listing” **data-ajax-wishlist**=”true” **data-compare-ajax**=”true” **data-infinite-scrolling**=”true” **data-loadprevioussnippet**=”Vorherige Artikel laden” **data-loadmoresnippet**=”Weitere Artikel laden” **data-categoryid**=”59" **data-pages**=”1" **data-threshold**=”4" **data-pageshortparameter**=”p”>

      *<!-- Then child divs for all the product cards -->*

      <div class=”product--box box--image” **data-page-index**=”1" **data-ordernumber**=”SW10414" **data-category-id**=”59">

        [...]

        *<!-- In the child divs we have links to the product detail pages, for example wrapping the image.. -->*

        <a href=”[[](https://www.shopwaredemo.de/leichtes-tuch-taupe-hell-415?c=59)...]" title=”[...]” class=”product--image”>
          <span class=”image--element”>
            <span class=”image--media”>
              <img srcset="[...] 2x” alt=”[...]” title=”[...]”>
            </span>
          </span>
        </a>

        *<!-- ... or the product title -->*

        <a href="[[](https://www.shopwaredemo.de/leichtes-tuch-taupe-hell-415?c=59)...]" class=”product--title” title=”[...]”>
          LEICHTES TUCH TAUPE HELL
        </a>

        [...]

      </div>

      [...]

    </div>
Let’s assume now that we are interested in tracking clicks on links within the product cards (a typical e-commerce action called product click).
With each product click you will want to send a lot of information to your Analytics, namely product details and maybe other interesting facts.
Given the HTML markup above and a simple All Elements Click Trigger in the Tag Manager, how does the event look like when clicking on such a product detail’s link? This is how:
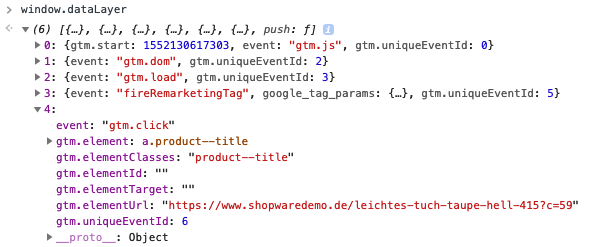
Besides the built-in Tag Manager variables like gtm.element etc. not too much information, right?
And how will the same event look like when you apply the code given in this article? Check it out:
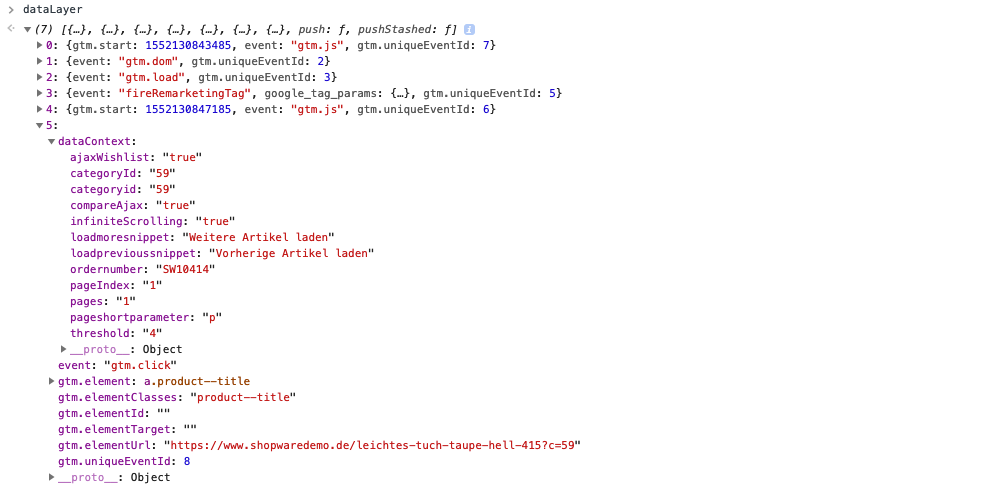
Now that’s a stunner! Next to the built-in variables we have another property called dataContext which contains all information collected from data- attributes found while traversing the DOM upwards from gtm.element.
In this Shopware case, you suddenly have information like whether infinite scrolling is active or not straight in your NATIVE GTM click event.
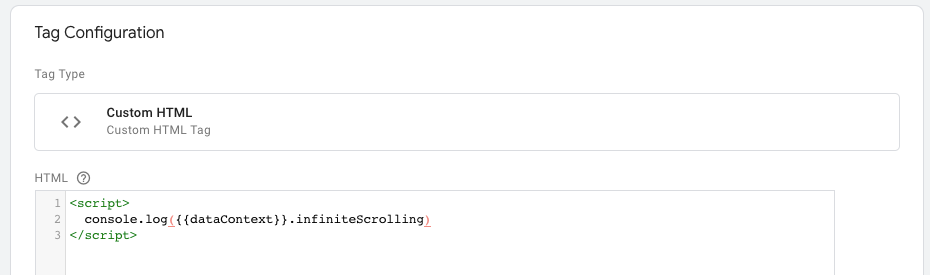
Inside Tag Manager, you can now just add a DataLayer Variable “dataContext” and access all of its properties whenever needed like in this dummy:
The implementation code for you to copy and paste
Replace the original GTM snippet with the extended version as seen in the Gist below:
/**
 * THE STANDARD..
 *
 */

(function(w,d,s,l,i){w[l]=w[l]||[];w[l].push({'gtm.start':
new Date().getTime(),event:'gtm.js'});var f=d.getElementsByTagName(s)[0],
j=d.createElement(s),dl=l!='dataLayer'?'&l='+l:'';j.async=true;j.src=
'https://www.googletagmanager.com/gtm.js?id='+i+dl;f.parentNode.insertBefore(j,f);
})(window,document,'script','dataLayer','GTM-XXXXXXX');

/**
 * ..BECOMES --->
 *
 */

window.dataLayer = window.dataLayer || [];
window.dataLayer.pushStashed = window.dataLayer.push;
Object.defineProperty(window.dataLayer, 'push', {
  set(y) {
    this.pushStashed = y;
    Object.defineProperty(this, 'push', {
      writable: true,
      value: function() {
        arguments = [].map.call(arguments, function(event) {
          if (event && event["gtm.element"]) {
            event.dataContext = {}, elem = event["gtm.element"];
            for (; elem && elem !== document; elem = elem.parentNode) {
              [].forEach.call(elem.attributes, function(attr) {
                if (/^data-/.test(attr.name)) {
                  var camelCaseName = attr.name.substr(5).replace(/-(.)/g, function($0, $1) {
                    return $1.toUpperCase();
                  });
                  event.dataContext[camelCaseName] = event.dataContext[camelCaseName] || attr.value;
                }
              });
            }
          }
          return event;
        });
        return this.pushStashed.apply(null,arguments);
      }
    });
  },
  get() {
    return this.pushStashed
  },
  configurable: true
});

(function(w,d,s,l,i){w[l]=w[l]||[];w[l].push({'gtm.start':
new Date().getTime(),event:'gtm.js'});var f=d.getElementsByTagName(s)[0],
j=d.createElement(s),dl=l!='dataLayer'?'&l='+l:'';j.async=true;j.src=
'https://www.googletagmanager.com/gtm.js?id='+i+dl;f.parentNode.insertBefore(j,f);
})(window,document,'script','dataLayer','GTM-XXXXXXX');
Detailed and technical explanation of how the code was derived
If you’re interested in how the above code works, I will try to outline it in this chapter.
Let’s start with the conceptualization, i.e., the question of how to achieve the goal.
Thinking about how to add more information to an argument when dataLayer.push() is called, we come to the conclusion that we must write a custom push function for the dataLayer variable.
When you lookup window.dataLayer.push, though, you will see that the classic Array.prototype.push is already replaced with another one by the GTM library.
And, our dominant condition is that we cannot (read: SHOULD NOT) just alter the minified GTM library code as we want to remain compatible with new releases of the very.
Yet our starting point is exactly this GTM library. If you prettify a bit you will come across this piece of code:
    ze = function() {
                var a = La("dataLayer", []),
                    b = La("google_tag_manager", {});
                b = b["dataLayer"] = b["dataLayer"] || {};
                Tc(function() {
                    b.gtmDom || (b.gtmDom = !0, a.push({
                        event: "gtm.dom"
                    }))
                });
                qe(function() {
                    b.gtmLoad || (b.gtmLoad = !0, a.push({
                        event: "gtm.load"
                    }))
                });
                var c = a.push;
     **           a.push = function() {
                    var b;
                    if (0 < J.SANDBOXED_JS_SEMAPHORE) {
                        b = [];
                        for (var e = 0; e < arguments.length; e++) b[e] = new le(arguments[e])
                    } else b = [].slice.call(arguments, 0);
                    c.apply(a, b);
                    for (re.push.apply(re, b); 300 < this.length;) this.shift();
                    return xe()
                };**
                re.push.apply(re, a.slice(0));
                A(ye)
            };
This is the part where immediately after pushing the gtm.load event to the dataLayer variable, the GTM library overrides the dataLayer’s push function (as inherited from Array.prototype) with a custom one.
What does that mean for our concept? It means that we must find a way to implement the following logic:
Wait until GTM overrides dataLayer.push
Then immediately store GTM’s push function and replace dataLayer.push again with our own custom function which
first processes our custom stuff and then invokes the stored GTM push function with our result
My solution for that is the code provided in this article. Let’s quickly go through it:
Initiating the dataLayer
We initiate the dataLayer variable and already backup the push function in the property pushStashed
window.dataLayer = window.dataLayer || [];
window.dataLayer.pushStashed = window.dataLayer.push;
We define dataLayer's push with accessor descriptors
The beauty of temporarily defining a setter and getter for the push function is that we can use it as a kind of callback for when GTM overrides the push function.
Object.defineProperty(window.dataLayer, 'push', {
  set(y) {
What happens when GTM replaces dataLayer.push
When GTM wants to override dataLayer.push now, our setter launches with the variable y holding GTM’s custom push function. We then store this function in pushStashed. Then we redefine dataLayer.push, switching back to data descriptors. That is, dataLayer.push will again have a value which is our custom function.
        this.pushStashed = y;
        Object.defineProperty(this, 'push', {
          writable: true,
          value: function() {
Our custom function
From now on, our custom function is invoked when somewhere on our website dataLayer.push() is called. The function swallows all arguments — for the case when multiple args are passed, like in dataLayer.push({event: 1},{event: 2}). Mapping all arguments, we look for the gtm.element property in each of which. If found, we traverse the DOM upwards, thereby collecting all data- attributes and populating dataContext.
    arguments = [].map.call(arguments, function(event) {
              if (event && event["gtm.element"]) {
                event.dataContext = {}, elem = event["gtm.element"];
                for (; elem && elem !== document; elem = elem.parentNode) {
                  [].forEach.call(elem.attributes, function(attr) {
                    if (/^data-/.test(attr.name)) {
                      var camelCaseName = attr.name.substr(5).replace(/-(.)/g, function($0, $1) {
                        return $1.toUpperCase();
                      });
                      event.dataContext[camelCaseName] = event.dataContext[camelCaseName] || attr.value;
                    }
                  });
                }
              }
              return event;
            });
Let GTM do the rest
Finally, we hand over our result to GTM’s push function which can now be found in dataLayer.pushStashed.
            return this.pushStashed.apply(null,arguments);
          }
        });
      },
      get() {
        return this.pushStashed
      },
Mandatory stuff
Don’t forget to set configurable:true when you switch to accessor descriptors as otherwise dataLayer.push cannot be redefined again.
      configurable: true
    });
Finally I can just say, thank you Yehoshua Coren for providing the idea. This new approach will heavily influence my future tracking setups (to the bettter).