

February 17, 2019
Cookie-less Duplicate Transaction Prevention in Google Analytics
The niche-solution for neither 100% client-side nor 100% server-side de-duplication at your fingertips.
One of the worst things that can happen to your Analytics account is counting one transaction multiple times, i.e., artificially inflating your success metrics. Unfortunately, for reasons usually inherent to how the triggers are set up, this is exactly what happens as Analytics does not consider transaction ids unique. Instead, every (transaction) hit is just processed.
To cope with that shortcoming, Analytics specialists usually deploy either of two solutions.
Sending transaction hits from the server-side
In my opinion, this is in any case the best solution as the vital information of a successful transaction should only be triggered by the backend system.Leveraging browser cookies / storage to prevent the client from sending multiple hits for the same transaction id
Perfected by Simo Ahava using a customTask to extend Analytics’ sendHitTask.
Talking to practitioners, though, it turns out that there can be the need for a third solution which is introduced in this article, including the needed code.
Regarding backend tracking, many face the problem of their clients not having the needed dev capabilities to implement the backend transaction tracking. At least not in a reasonable period of time. Yet the Analytics specialist is responsible for providing accurate tracking.
And while storing transaction ids in the client’s browser should be sufficient for most of the web properties, some industry colleagues report that duplicate hits can occur nonetheless, for example after cookie-purging.
Adding a serverless de-duplication proxy
So here we go with a third solution which adds some kind of backend layer to be more reliable than cookies, yet without the need to book backend dev resources.
How it works
Considering a typical setup of having Google Tag Manager deployed, we add a customTask to our relevant Google Analytics tags which overrides the sendHitTask. While technically just reproducing the original sendHitTask, the big difference is that we don’t send the hit to the google-analytics.com collector. Instead, we send the hit to our own custom domain which resolves to a Cloudflare Worker. The Cloudflare Worker will pick up the hit incl. the Analytics payload, check for previous hits with the same transaction id in a Firebase realtime database, and only will forward the hit to the original Google Analytics collector if the transaction is seen for the first time.
In short, our ingredients
customTask to override the sendHitTask, i.e., making the client send the tracking hit to our-domain.com/collect instead of google-analytics.com/collect
Cloudflare Worker script listening on our-domain.com/collect as a proxy between the client and Google Analytics
Firebase realtime database used for storing transaction ids (needed until Cloudflare makes the KV store inside Workers publicly available)
Getting started step by step
If you want a separate domain for tracking purposes, register one and add it to your Cloudflare account.
Create a new Firebase project and obtain the id as well as the database secret.
Create a new Custom JavaScript Variable in Tag Manager and fill it with the script below while replacing the placeholder with your own domain in row 3
function () {
  return function (model) {
    var proxyDomain = "https://<yourdomain.com>/collect";
    var proxySendHitTask = function () {
      function pixel(hitPayload) {
        var result = false;
        try {
          document.createElement("img").src = proxyDomain + "?" + hitPayload, result = true
        } catch (e) {}
        return result
      }
      return {
        send: function (hitPayload) {
          var result;
          if (!(result = 2036 >= hitPayload.length && pixel(hitPayload))) {
            result = false;
            try {
              result = navigator.sendBeacon && navigator.sendBeacon(proxyDomain,hitPayload)
            } catch (e) {}
          }
          if (!result) {
            var xhr;
            try {
              window.XMLHttpRequest && "withCredentials" in (xhr = new XMLHttpRequest) && (xhr.open("GET", proxyDomain, true), xhr.setRequestHeader("Content-Type", "text/plain"), xhr.send(hitPayload), result = true)
            } catch (e) {}
          }
          return result || pixel(hitPayload)
        }
      }
    }();
    tracker.set("sendHitTask", function (model) {
      proxySendHitTask.send(model.get("hitPayload"));
    }, true)
  }
}
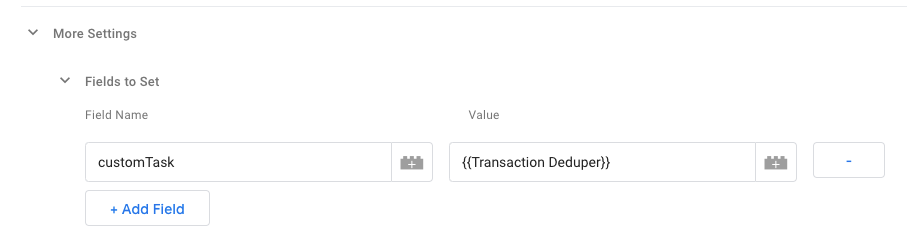
- Edit all Google Analytics Tags in your Tag Manager that send transactions. Specify the field customTask to be filled with the JavaScript variable you created above.
- Open your Cloudflare Workers editor and insert the script below. Don’t forget to alter the Config section according to your Firebase credentials. Hit Deploy.
addEventListener('fetch', event => {
  if(event.request.url.indexOf('/collect') > -1)
    event.waitUntil(process(event.request))
  event.respondWith(new Response('',{status:200}))
})

/**
 * CONFIG SECTION
 */
const ANALYTICS_URL = 'https://www.google-analytics.com'
const FB_URL = 'https://<your-database-id>.firebaseio.com/transactions/';
const FB_KEY = '<your-database-secret>';

/**
 * Process the hit, but only for transactions that haven't been seen before
 * param {Request} Original Request
 */
const process = async (request) => {
  const url = new URL(request.url)
  const transactionId = url.searchParams.get('ti')
  const hitType = url.searchParams.get('t')

  let entry = await lookup(transactionId)
  let entryData = await entry.json()

  if(entryData)
    return (hitType != 'item') ? logDuplicateHit(transactionId,++entryData.hits) : Promise.resolve(1)
  else {
    return Promise.all([
      (hitType != 'item') ? logTransaction(transactionId) : Promise.resolve(1),
      analyticsHit(decorateHitPayload(url,request.headers.get('CF-Connecting-IP'),encodeURIComponent(request.headers.get('user-agent'))))
    ])
  }
}

/**
 * Check for transaction in Firebase database
 * @param {string} Transaction ID
 */
const lookup = async (id) => (fetch(FB_URL+id+'.json?auth='+FB_KEY))

/**
 * Log new transactions in Firebase database
 * @param {string} Transaction ID
 */
const logTransaction = async (id) => (fetch(new Request(FB_URL+id+'.json?auth='+FB_KEY, {
  method: 'PUT',
  headers: {
    'Content-Type': 'application/json'
  },
  body: JSON.stringify({
    createdAt: new Date().getTime(),
    hits: 1
  })
})))

/**
 * Increase hit count for duplicate transactions in Firebase database
 * @param {string} Transaction ID
 * @param {number} Hit Count
 */
const logDuplicateHit = async (id,count) => (fetch(new Request(FB_URL+id+'.json?auth='+FB_KEY, {
  method: 'PATCH',
  headers: {
    'Content-Type': 'application/json'
  },
  body: JSON.stringify({
    hits: count
  })
})))

/**
 * Decorate the Analytics hit with client's IP and client's User Agent
 * @param {URL} request url
 * @param {string} User's IP
 * @param {string} User's User Agent
 */
const decorateHitPayload = (url,userIP,userAgent) => (url.pathname+url.search+'&ua='+userAgent+'&uip='+userIP)

/**
 * Forward hit to Google Analytics
 * @param {string} Hit Payload
 */
const analyticsHit = async (hitPayload) => (fetch(ANALYTICS_URL+hitPayload))
This was the very brief step-by-step guide which implies you have fundamental knowledge about the used technologies as otherwise the steps may not be sufficiently granular for you to reproduce. If questions are left, please feel free to ask in the comments.
Otherwise, this is already enough to have an almost-for-free transaction deduper running. The Worker script will additionally log all attempts as hits in each transaction record in the database so as to get an overview of how often duplicate hits occur.